E-Jet systems
How to set up the E175 and E170 FMS, step by step
Initialization, route, departure, performance and takeoff data: the E170 and E175 FMS setup flow, in the order the FMS needs the data, with real screenshots from the trainer.
In short
- Set up the FMS in the order it needs the data: initialization, route, departure, performance and takeoff data, then the review.
- Every page is checked against a source document: flight plan, clearance, ATIS and weight data. Nothing goes in from memory.
- Departure and route stay in a modified plan until you review and activate; performance and takeoff data need a cross-check by both pilots.
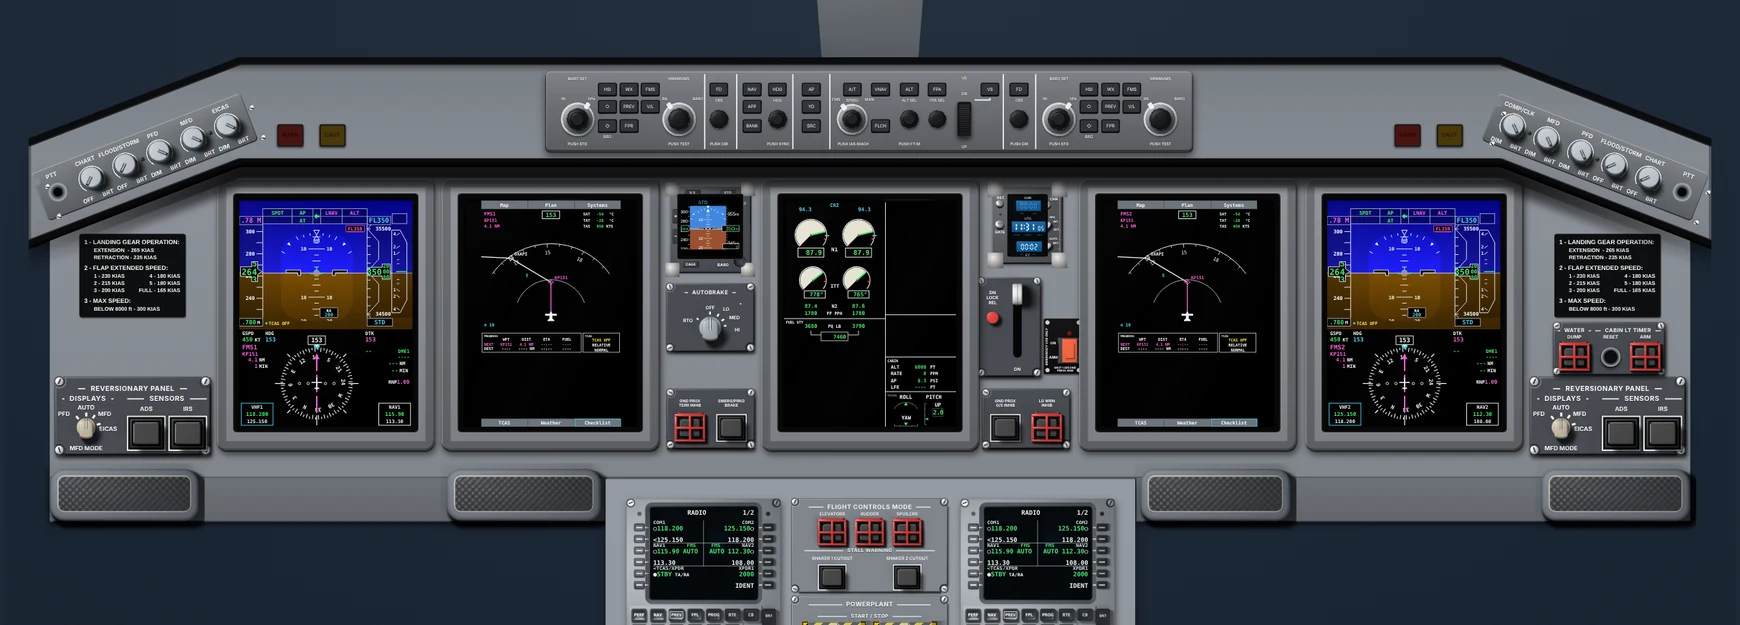
Pilots coming to the E170 or E175 from another type often find the MCDU intimidating on day one: many pages, many line select keys, many boxed fields. The good news is that FMS setup follows a simple logic. The FMS needs to know where the airplane is, where it is going, which way and how heavy it is. With that, it computes predictions, speeds and guidance.
This guide follows the pages of the E-Jet E1 Next Generation FMS (the NG FMS that came with Load 27), the same pages you find in the E175 version of the TOGA Academy trainer. If you are not sure what a load is, start with What is an avionics “load” on the E-Jet?: the software version changes pages and functions.
Important: this article is study material. Always follow your operator’s approved manuals and procedures; your airline’s sequence, checks and division of duties have the final word.
Before you touch the MCDU: get your documents
FMS setup is a checked transcription. Before typing, have the operational flight plan, the clearance (or expected route), the departure ATIS, the weight and fuel data and the takeoff performance calculation at hand. Every page you fill in will be checked against one of them. If a number has no source, it does not go in.
Also agree on who does what. In many procedures one pilot programs and the other checks independently, and some pages are filled in by one pilot and reviewed by the other. Knowing that up front keeps both of you from being heads-down at the same time.
Step 1: initialization and database
First, make sure the FMS knows where the airplane is and is using the right navigation database. On the E1 NG FMS these pages live on the second screen of the NAV INDEX: NAV IDENT shows the active navigation database and its validity period, and POS INIT is where the initial position is confirmed.
- Check that the database is current for the date of the flight. An expired database is not a detail.
- Confirm the initial position using the method your procedure calls for, usually the gate or airport reference and the sensor position.
- Look at the progress page: it shows the estimated navigation accuracy (EPU) and the RNP in use. That pair is worth understanding from day one.
Step 2: origin, destination and alternate on the RTE page
The RTE key opens the route page. The first screen takes the origin, the destination, the departure runway and the alternate. This is also where the flight ID and company route fields live, when the operator uses stored routes or datalink.
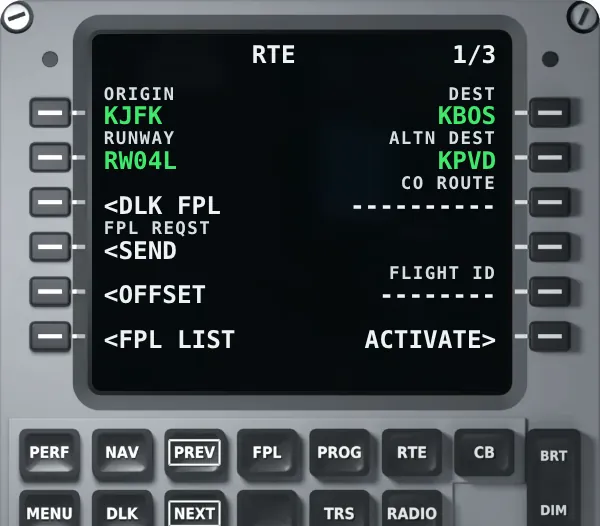
Use a three-beat habit: type into the scratchpad, read what you typed, and only then press the line select key. Then check the field you filled. Many invalid-format messages disappear once you read the scratchpad before you insert.
Step 3: the route, airway by airway
On the next RTE screens, the route goes in as VIA (airway or direct) and TO (the fix where that segment ends). Follow the flight plan in order, without skipping, and check each segment right after you enter it.
- Fixes with the same name in different regions exist. If the FMS offers a list, choose by position, not by whatever is first.
- Every discontinuity has a reason. Some are typos; others are there on purpose, for example before a vectored segment. Understand it before you delete it.
- Look at the route on the MFD map. A zigzag, a leg that doubles back or a line across the map gives the error away at once.
Step 4: departure procedure (SID) and transition
The departure goes in on the DEPARTURE page, reached from the NAV INDEX or from the prompt on the RTE page. First the runway, then the SID, then the transition that joins the SID to the route. The FMS shows what is active and what is selected: a selection only becomes part of the plan when you apply it and, after reviewing it, activate it.
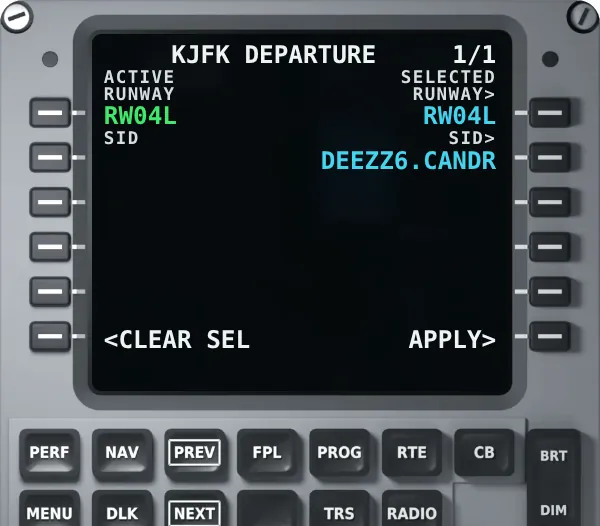
After applying, review the modified flight plan: SID altitude and speed constraints, the link to the first enroute fix and any discontinuities. The arrival (STAR) and approach usually go in later, with destination information in hand, but follow the timing your procedure sets.
Step 5: PERF INIT, weights and fuel
The PERF key opens the performance index. On the E1 NG FMS, PERF INIT has three screens:
- Screen 1: airplane data and reserve fuel, per the operator’s fuel policy.
- Screen 2: cruise altitude, cruise wind and temperature deviation, zero fuel weight (ZFW) and fuel. The FMS adds them up and shows the gross weight.
- Screen 3: climb, cruise and descent speed schedules and, when the airplane has the function, the cost index.
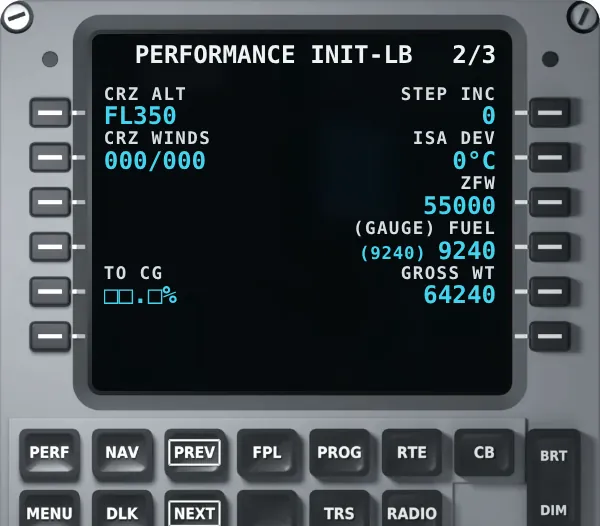
Always do an order-of-magnitude check: does the gross weight match the weight and balance document? Does the fuel match the plan and what the gauges show? A swapped digit in the ZFW slips by if nobody thinks about the number.
Step 6: TAKEOFF INIT and the speeds
Still in the performance index, TAKEOFF leads to the takeoff data pages. The first screen covers runway and conditions: runway heading, pressure altitude and setting, slope, wind and runway condition. The second covers configuration: flaps, temperature, use of an assumed temperature (FLEX) and the takeoff thrust dataset for the airplane.
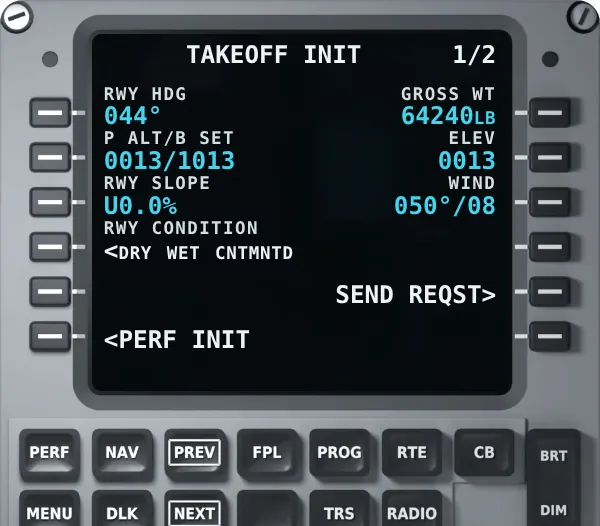
Takeoff speeds and thrust come from the operator’s approved performance calculation. The FMS is where they go in and where you check them, not where they come from. Any change of runway, weight or wind restarts the check of everything that depends on it.
Step 7: final review and cross-check
With everything filled in, do the full review: active flight plan against the operational flight plan, the MFD map, departure constraints, weights, fuel and takeoff data. Ideally the other pilot checks against the documents, not against the screen you filled in. The most common slips at this stage are covered in our free E-Jet FMS guide.
How to practice this flow before the sim
Simulator time is short and expensive. Arrive with the MCDU flow automated and you have brain left to fly. In the E175 version of the TOGA Academy trainer, the NG FMS pages are linked to the cockpit, with weights in pounds and a navigation database with US airports. To practice the basic setup flow for free, open the free MCDU trainer.
Frequently asked questions
In what order do you set up the E175 FMS?
Follow your operator’s flow. In general: initialization and database, route, departure, performance, takeoff data and a final review with a cross-check.
Do I need to enter the arrival and approach on the ground?
It depends on the operator’s procedure. Many enter the arrival and approach later, with updated destination information. What matters is that everything is reviewed before use.
Do the takeoff speeds come from the FMS?
No. They come from the operator’s approved performance calculation. The FMS is where you enter and check them, always with a cross-check.
Does the TOGA trainer cover the E170 and E190?
The E-Jet E1 trainer covers the E170, E175, E190 and E195. It is a study tool with simplified logic: your operator’s manuals always prevail.
Sources
- FAA. Advanced Avionics Handbook (FAA-H-8083-6), chapters on FMS and automation management.
- FAA. Advisory Circular AC 120-71B, Standard Operating Procedures and Pilot Monitoring Duties for Flight Deck Crewmembers.
- TOGA Academy. E-Jet E1 MCDU trainer (E175 version, NG FMS pages).